> ## Documentation Index
> Fetch the complete documentation index at: https://docs.servflow.io/llms.txt
> Use this file to discover all available pages before exploring further.
# Actions Overview
> Understanding actions — the building blocks of ServFlow workflows
Actions are the core building blocks of ServFlow workflows. They perform discrete operations such as fetching data from a database, calling external APIs, running AI agents, or transforming values. Every workflow consists of an entry point, one or more actions, and a response.
***
## How Actions Work
When a workflow executes, actions run in sequence based on the routing you define. Each action:
1. **Receives input** — Data from the request or previous action results
2. **Executes its operation** — Fetches data, calls an API, transforms values, etc.
3. **Stores its result** — Output is saved and accessible to subsequent steps
4. **Routes to the next step** — Either `next` (on success) or `fail` (on error)
You reference action results using the `{{ .action_id }}` syntax. For example, if an action with ID `get_user` returns user data, access the email field with `{{ .get_user.email }}`.
***
## Creating Actions in the Dashboard
The ServFlow dashboard provides a visual interface for adding and configuring actions.
### Adding an Action
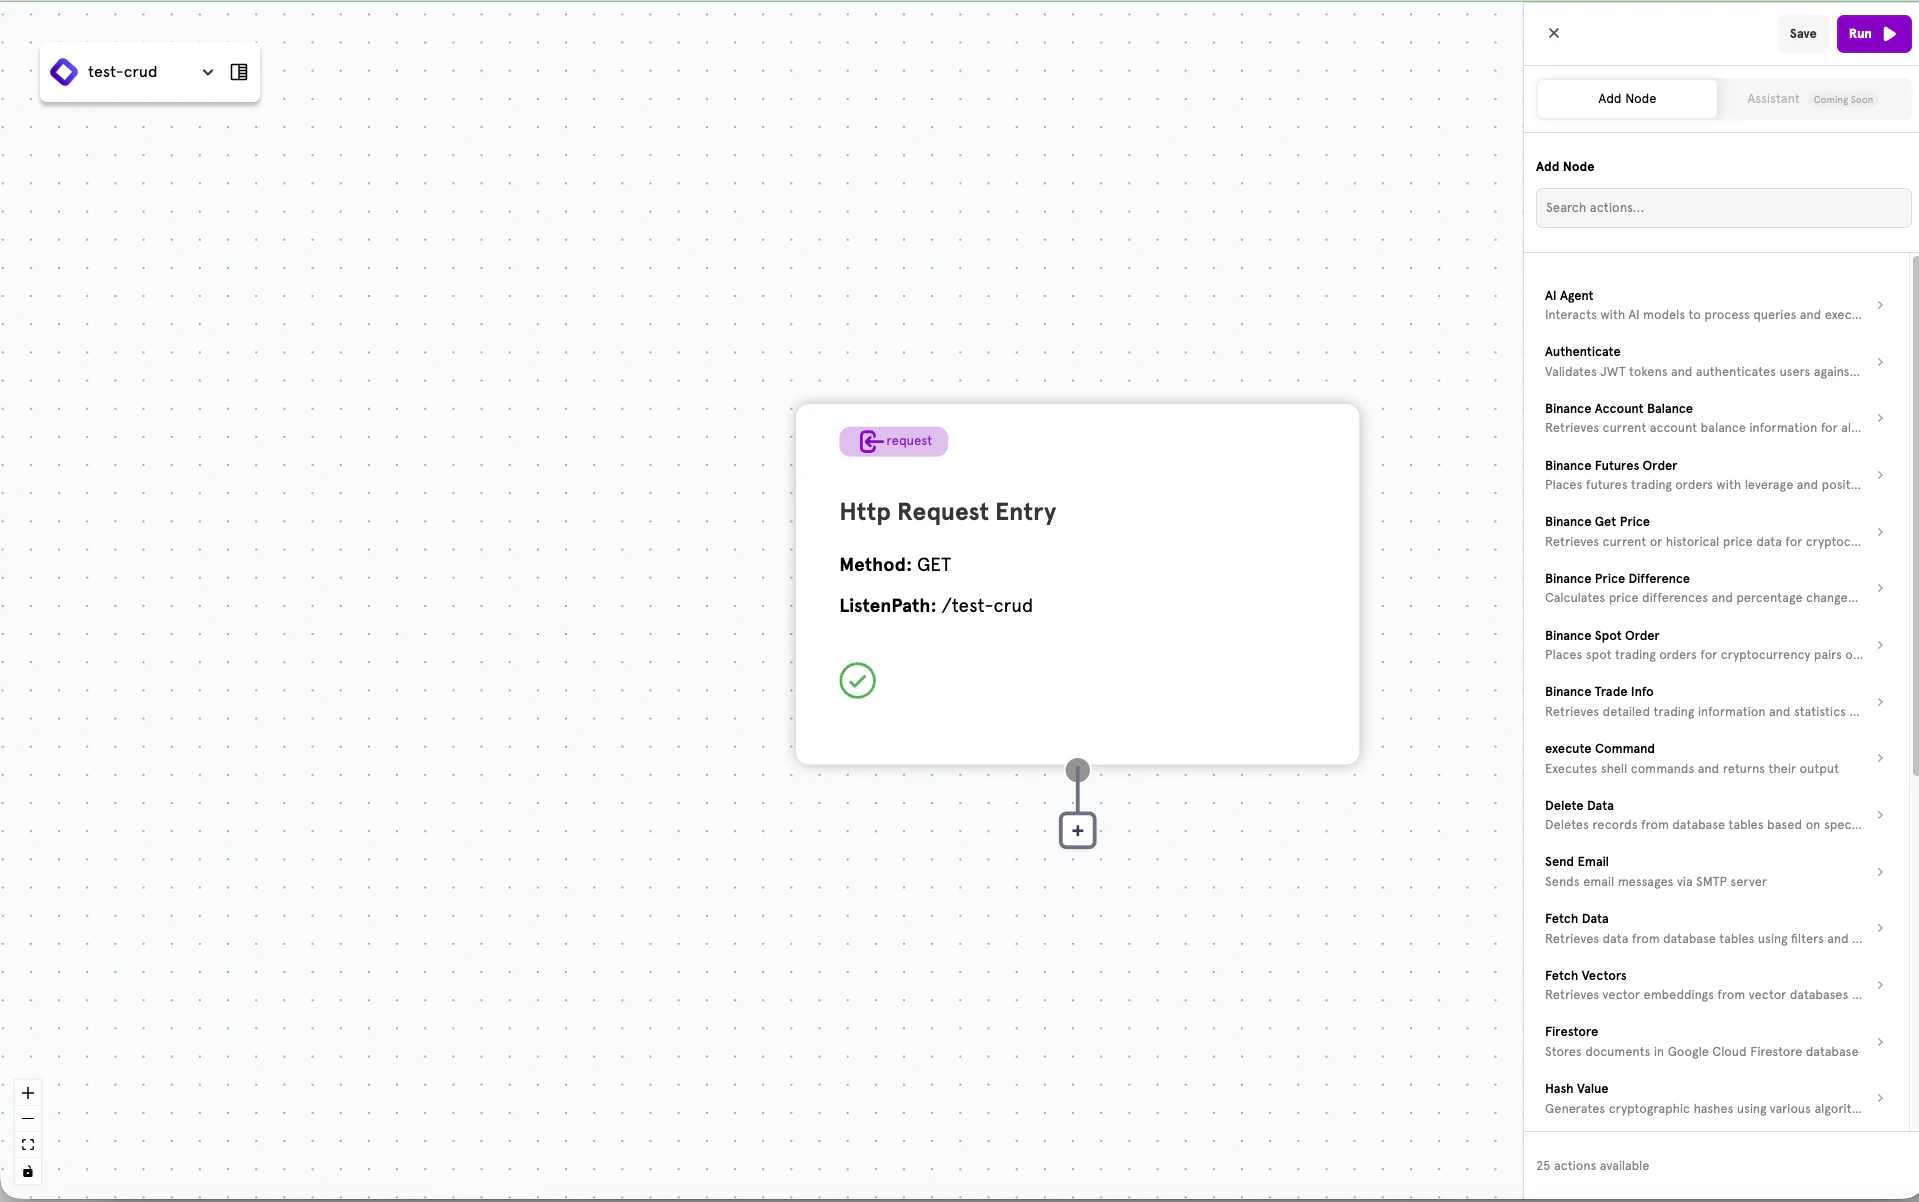
1. Click the **+** button below an existing node in the workflow canvas
2. Select **Actions** from the node type options
3. Browse the available actions in the sidebar and select one
 ### Configuring an Action
Selecting an action opens the configuration panel on the left side of the screen. Each action type has specific fields to configure.
### Configuring an Action
Selecting an action opens the configuration panel on the left side of the screen. Each action type has specific fields to configure.
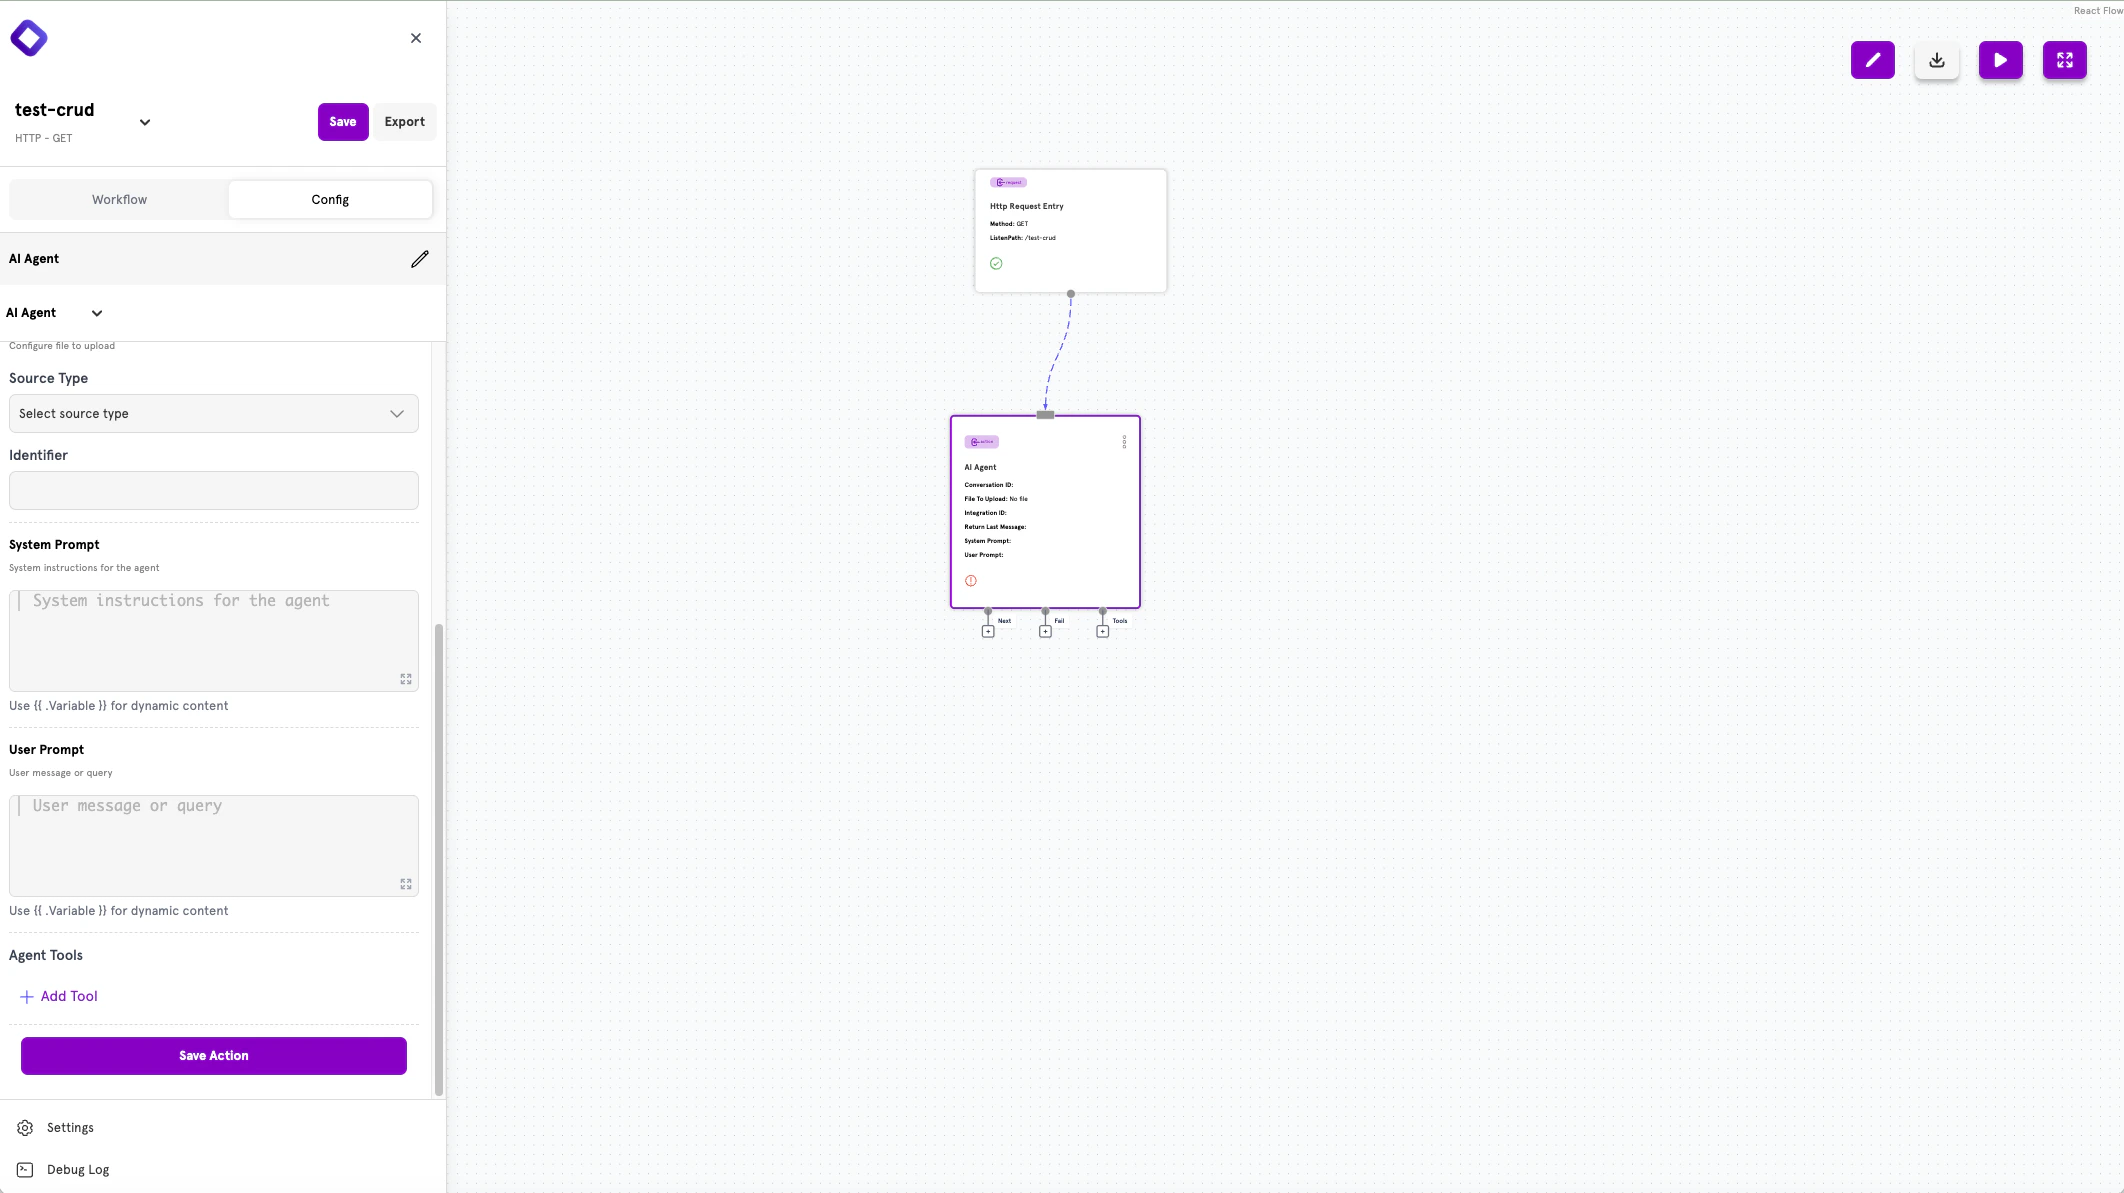 Use `{{ .Variable }}` syntax in input fields to reference dynamic content from previous actions or request parameters. See [Dynamic Content](/references/concepts/dynamic-content) for details.
### Action Outputs
Actions have output handles for defining the flow:
* **Next** — Routes on successful completion
* **Fail** — Routes when an error occurs
* **Tools** — Additional outputs for specific action types (e.g., AI Agent tools)
Drag connections from these handles to other actions, conditionals, or response nodes.
***
## Creating Actions in YAML
Actions can also be defined in YAML configuration files. This approach is preferred for version control, CI/CD pipelines, and production deployments in [Headless Mode](/running-modes).
See the [YAML Quickstart](/quickstart-yaml) for a complete tutorial on building workflows with YAML.
### Action Structure
Every action follows this structure:
```yaml theme={null}
actions:
action_id:
type: action_type
config:
# type-specific configuration
next: action.next_step
fail: response.error
```
### Common Fields
| Field | Type | Required | Description |
| -------- | ------ | -------- | ----------------------------------------------------------- |
| `type` | string | Yes | The action type identifier (e.g., `fetch`, `http`, `agent`) |
| `config` | object | No | Type-specific configuration options |
| `next` | string | No | Step to execute on success |
| `fail` | string | No | Step to execute on failure |
### Chaining Actions
Use the `next` and `fail` fields to define execution paths. The routing syntax follows the pattern `type.identifier`:
* `action.other_action` — Route to another action
* `conditional.check_value` — Route to a conditional branch
* `response.success` — Route to a response
```yaml theme={null}
actions:
get_user:
type: fetch
config:
integrationID: my_database
table: users
filters:
- field: id
operator: eq
value: "{{ param \"user_id\" }}"
single: true
next: action.send_welcome
send_welcome:
type: email
config:
recipientEmail: "{{ .get_user.email }}"
subject: "Welcome!"
content: "Hello {{ .get_user.name }}, welcome to our platform."
next: response.success
```
***
## Next Steps
Browse all available action types by category.
Add branching logic to your workflows.
Define how your workflow returns data.
Use templates to reference dynamic values.
Use `{{ .Variable }}` syntax in input fields to reference dynamic content from previous actions or request parameters. See [Dynamic Content](/references/concepts/dynamic-content) for details.
### Action Outputs
Actions have output handles for defining the flow:
* **Next** — Routes on successful completion
* **Fail** — Routes when an error occurs
* **Tools** — Additional outputs for specific action types (e.g., AI Agent tools)
Drag connections from these handles to other actions, conditionals, or response nodes.
***
## Creating Actions in YAML
Actions can also be defined in YAML configuration files. This approach is preferred for version control, CI/CD pipelines, and production deployments in [Headless Mode](/running-modes).
See the [YAML Quickstart](/quickstart-yaml) for a complete tutorial on building workflows with YAML.
### Action Structure
Every action follows this structure:
```yaml theme={null}
actions:
action_id:
type: action_type
config:
# type-specific configuration
next: action.next_step
fail: response.error
```
### Common Fields
| Field | Type | Required | Description |
| -------- | ------ | -------- | ----------------------------------------------------------- |
| `type` | string | Yes | The action type identifier (e.g., `fetch`, `http`, `agent`) |
| `config` | object | No | Type-specific configuration options |
| `next` | string | No | Step to execute on success |
| `fail` | string | No | Step to execute on failure |
### Chaining Actions
Use the `next` and `fail` fields to define execution paths. The routing syntax follows the pattern `type.identifier`:
* `action.other_action` — Route to another action
* `conditional.check_value` — Route to a conditional branch
* `response.success` — Route to a response
```yaml theme={null}
actions:
get_user:
type: fetch
config:
integrationID: my_database
table: users
filters:
- field: id
operator: eq
value: "{{ param \"user_id\" }}"
single: true
next: action.send_welcome
send_welcome:
type: email
config:
recipientEmail: "{{ .get_user.email }}"
subject: "Welcome!"
content: "Hello {{ .get_user.name }}, welcome to our platform."
next: response.success
```
***
## Next Steps
Browse all available action types by category.
Add branching logic to your workflows.
Define how your workflow returns data.
Use templates to reference dynamic values.