Build a fully functional Telegram bot that allows users to interact with their Binance accounts through natural language. The bot uses an AI agent to understand user requests and execute trading operations on their behalf — all configured through the ServFlow dashboard without writing code.
What you’ll build:
A Telegram bot that responds to messages via webhook
Secure per-user credential storage in MongoDB
AI-powered natural language processing for trading commands
Dynamic Binance integration using stored credentials
Account balance checking and price history tools
Import & Run Get started immediately by importing the complete workflow:
Download the Configuration
Import into ServFlow
In the ServFlow dashboard, click Import in the Files panel and select the downloaded YAML file
Configure Integrations
Set up the required integrations:
mongo-main — MongoDB for storing user credentialsopen-ai-main — OpenAI for the AI agent
Add Your Bot Token
Go to Settings → Secrets and add: Name Value TELEGRAM_BOT_TOKENYour bot token from BotFather
Set the Telegram Webhook
Tell Telegram where to send messages: curl -X POST "https://api.telegram.org/bot<YOUR_BOT_TOKEN>/setWebhook" \ -H "Content-Type: application/json" \ -d '{"url": "https://your-servflow-domain.com/telegram"}'
Test Your Bot
Open your bot in Telegram and try:
/save_creds your_api_key your_secret_key — Save Binance credentials“What’s my account balance?” — Check your balance
“Show me BTC price history for the last 12 hours” — Get price data
For local development, use ngrok to expose your local ServFlow instance to the internet. How It Works The rest of this guide explains how the imported workflow is structured and what each component does.
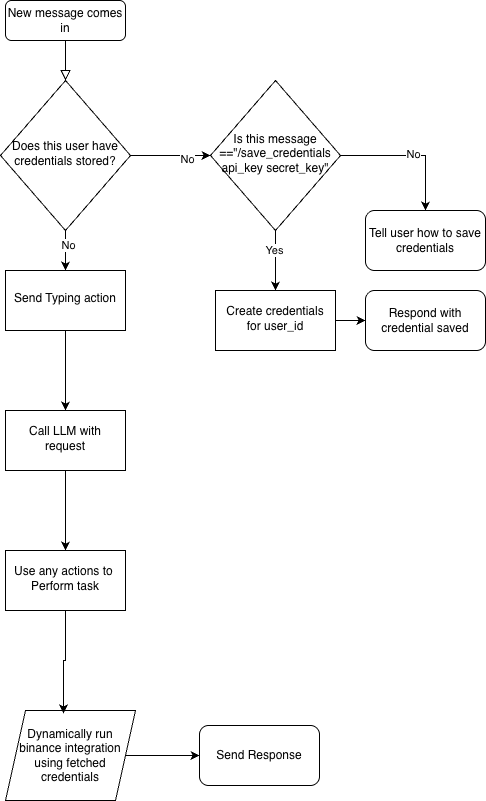
The workflow follows this decision tree:
New message arrives → Check if user has stored Binance credentialsIf credentials exist → Send typing indicator → Process with AI agent → Send responseIf no credentials → Check if message is a /save_creds commandIf save command → Store credentials → Confirm to userIf not save command → Tell user how to save credentials
Workflow Entry Point The workflow listens for Telegram webhook requests via an HTTP POST endpoint.
Setting Value Purpose Listen Path /telegramThe URL path Telegram sends messages to HTTP Method POSTTelegram webhooks use POST requests
Telegram sends webhook payloads as JSON containing message details. The key fields are message.chat.id, message.from.id, and message.text.
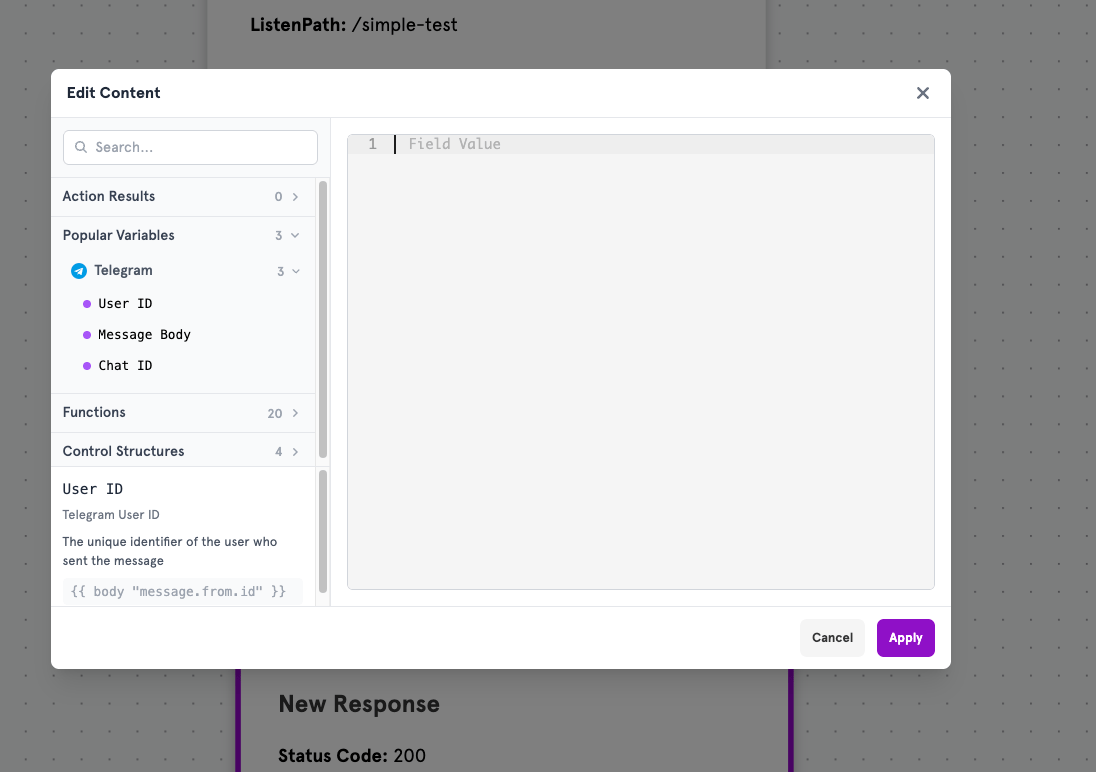
Telegram Field Presets Throughout this workflow, you’ll see references to Telegram message data. ServFlow automatically detects Telegram webhooks and provides convenient presets in the content editor.
When editing any field, open the content editor and expand Popular Variables → Telegram :
Preset Template Syntax Description User ID {{ body "message.from.id" }}Unique identifier of the message sender Message Body {{ body "message.text" }}The text content of the message Chat ID {{ body "message.chat.id" }}The chat/conversation identifier
Click any preset to insert it automatically — no need to memorize the syntax!
Action: Fetch Credentials Type: fetchThis action checks if the user has already stored their Binance API credentials in the database.
Field Value Purpose Integration ID mongo-mainThe MongoDB integration to query Table credentialsCollection storing user credentials Single Result ✅ Enabled Return one document instead of an array Should Fail ✅ Enabled Trigger fail path if query fails Fail If Empty ✅ Enabled Treat no results as a failure
Filter Configuration Field Operation Comparator user_id==User ID preset
Routing Path Destination When Next Is typingUser has stored credentials Fail parse_commandNo credentials found
Action: Parse Command Type: javascriptWhen a user doesn’t have credentials, this action parses the incoming message to check if they’re sending a /save_creds command.
Script Logic function servflowRun ( vars ) { const text = "{{ body \" message.text \" }}" ; const match = text . trim (). match ( / ^ \/ ( \w + ) \s * ( . * ) $ / ); if ( ! match || match [ 1 ]. toLowerCase () !== "save_creds" ) { return { command: "" , args: [] }; } const command = "/" + match [ 1 ]; const args = match [ 2 ]?. trim () ? match [ 2 ]. trim (). split ( / \s + / ) : []; return { command , args }; }
Output Field Description .parse_command.commandThe parsed command (e.g., /save_creds) or empty string .parse_command.argsArray of arguments (e.g., ["api_key", "secret_key"])
Conditional: Is Save Credentials Type: conditionalChecks if the parsed command is /save_creds.
Field Value Expression {{ eq .parse_command.command "/save_creds" }}
Routing Path Destination When True save_credsUser is saving credentials False Add credentialsUser needs instructions
Action: Save Credentials Type: storeStores the user’s Binance API credentials in MongoDB.
Field Value Purpose Integration ID mongo-mainMongoDB integration Table credentialsCollection to store in
Fields Stored Field Name Value Purpose user_idUser ID presetLinks credentials to Telegram user api_key{{ index .parse_command.args 0 }}First argument from command api_secret{{ index .parse_command.args 1 }}Second argument from command saved_at{{ now }}Timestamp for record-keeping
Action: Credentials Saved (HTTP) Type: httpSends a confirmation message to the user via Telegram.
Field Value HTTP Method POSTURL https://api.telegram.org/bot{{ secret "TELEGRAM_BOT_TOKEN" }}/sendMessage
Request Body Field Value chat_idChat ID presettextCredentials saved successfully
Action: Add Credentials (HTTP) Type: httpTells users without credentials how to save them.
Field Value HTTP Method POSTURL https://api.telegram.org/bot{{ secret "TELEGRAM_BOT_TOKEN" }}/sendMessage
Request Body Field Value chat_idChat ID presettextPlease add credentials first with /save_creds <api_key> <secret_key>
Action: Is Typing (HTTP) Type: httpSends a “typing” indicator so users know the bot is processing their request.
Field Value HTTP Method GETURL https://api.telegram.org/bot{{ secret "TELEGRAM_BOT_TOKEN" }}/sendChatAction?chat_id={{ body "message.chat.id" }}&action=typing
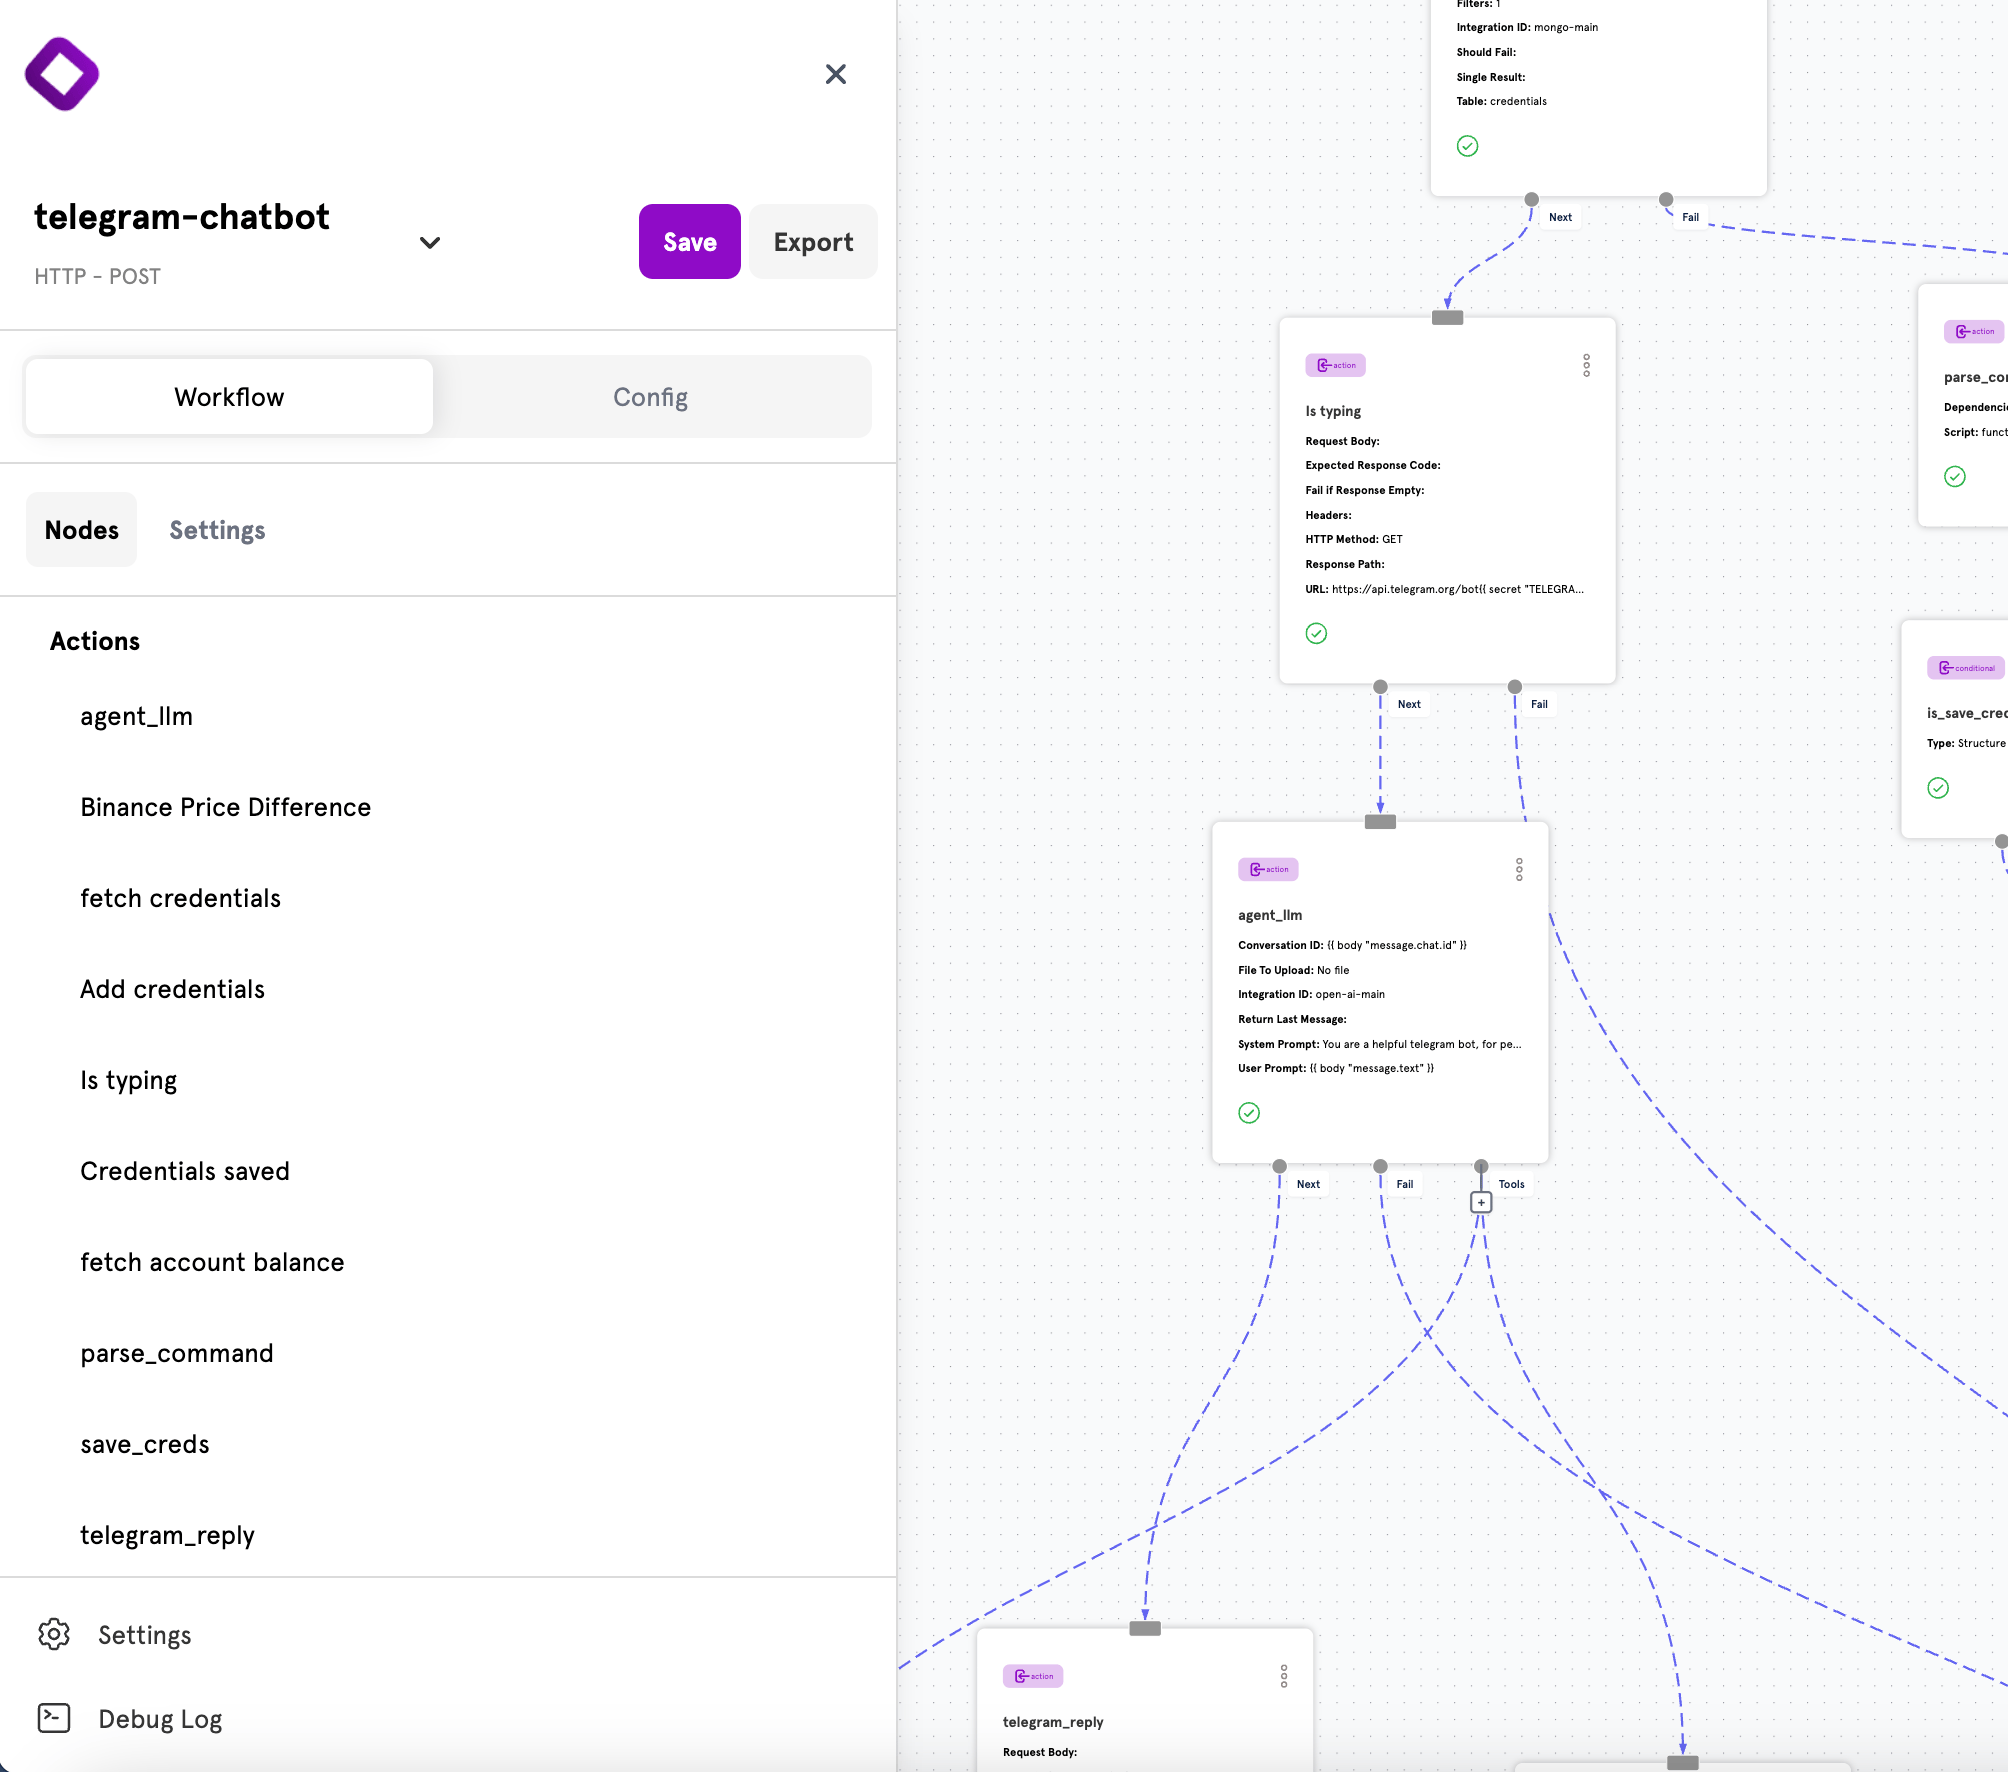
Action: Agent LLM Type: agentThe AI agent that understands natural language and decides which tools to use.
Field Value Purpose Integration ID open-ai-mainOpenAI integration Conversation ID Chat ID presetMaintains context across messages Return Last Message ❌ Disabled Return full agent response
System Prompt You are a helpful telegram bot for performing actions on behalf of a user. You have access to tools to help you achieve your request.
User Prompt Message Body preset — the actual message text from the user.Allows the agent to fetch price history data.
Field Value Type workflowName price_differenceDescription Gets price history ticks for a period. The period is the number of 1hr intervals (e.g., 12), the symbol is the pair (e.g., BTCUSDT) Parameters period, symbolStart Action Binance Price DifferenceReturn Value {{ escape (jsonout .get_price_difference) }}
Allows the agent to check the user’s Binance balance.
Field Value Type workflowName account_balanceDescription Fetches the account balance of the user Parameters (none) Start Action fetch account balanceReturn Value {{ .get_account_balance }}
Action: Binance Price Difference Type: binance/pricedifferenceCalled by the agent’s price_difference tool.
Field Value Purpose Integration ID telegram_bot_cred_storage_binanceDynamic Binance integration Interval 1hCandlestick interval Period {{ tool_param "period" }}From agent tool call Symbol {{ tool_param "symbol" }}From agent tool call
The tool_param function accesses parameters passed by the AI agent when it calls this tool.
Action: Fetch Account Balance Type: binance/accountbalanceCalled by the agent’s account_balance tool.
Field Value Purpose Integration ID telegram_bot_cred_storage_binanceDynamic Binance integration Futures ❌ Disabled Query spot account Symbol (empty) Return all balances
Action: Telegram Reply (HTTP) Type: httpSends the AI agent’s response back to the user.
Field Value HTTP Method POSTURL https://api.telegram.org/bot{{ secret "TELEGRAM_BOT_TOKEN" }}/sendMessage
Request Body Field Value chat_idChat ID presettext{{ .agent_llm | escape }}
The escape function ensures special characters in the AI response don’t break the JSON payload.
Dynamic Binance Integration The key to supporting multiple users is the lazy-loaded integration that uses each user’s stored credentials.
Field Value Purpose ID telegram_bot_cred_storage_binanceReferenced by Binance actions Type binanceBinance exchange integration Lazy Load ✅ Enabled Only initialize when first used
Dynamic Credentials Field Value Source API Key {{ .fetch_credentials.api_key }}From MongoDB query Secret Key {{ .fetch_credentials.api_secret }}From MongoDB query Testnet ❌ Disabled Use production (enable for testing) Timeout 30Request timeout in seconds
Lazy Load means the integration initializes only when an action uses it. At that point, the credentials from the fetch_credentials action are available, allowing each user’s Binance operations to use their own stored API keys.
Response Definitions Success Response Field Value Name successStatus Code 200Response Field message: Reply sent via Telegram
Error Response Field Value Name errorStatus Code 500Response Field error: {{ .error }}
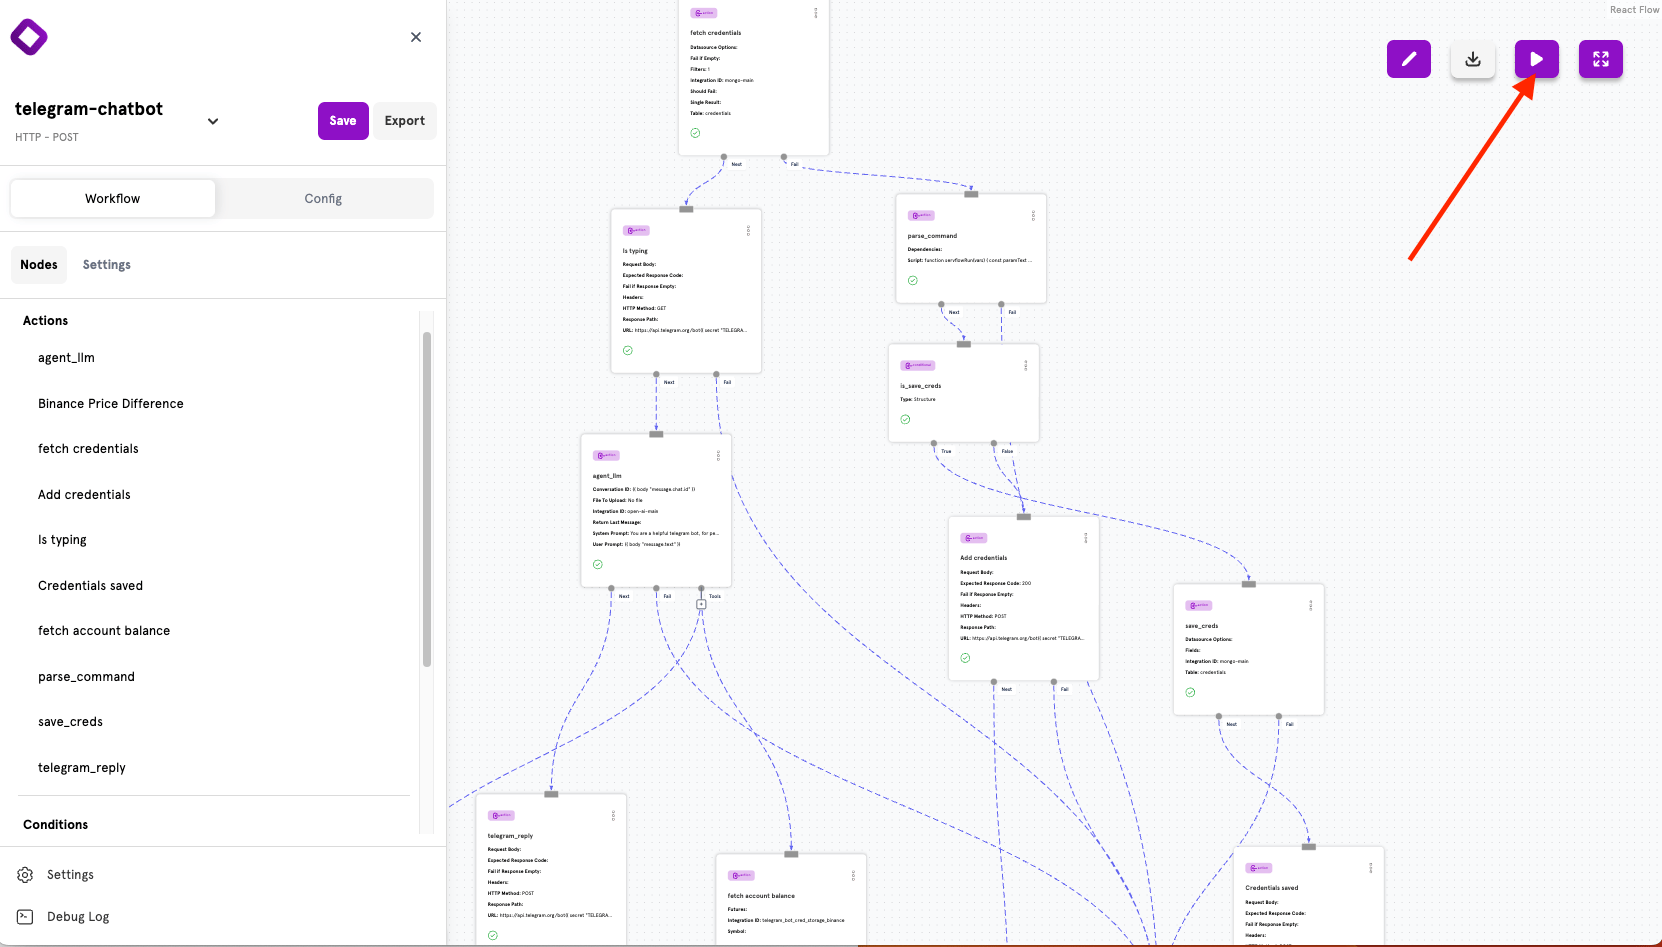
Testing Use ServFlow’s test mode to simulate requests without setting up the Telegram webhook.
Click the Play button in the top-right corner and enter a sample payload:
{ "message" : { "message_id" : 123 , "from" : { "id" : 12345678 , "first_name" : "Test" , "username" : "testuser" }, "chat" : { "id" : 12345678 , "type" : "private" }, "text" : "What is my account balance?" } }
Security Considerations Important security notes:
Never share your bot token — Anyone with the token can control your botUse HTTPS — Always deploy with SSL to protect credentials in transitConsider encryption — For production, encrypt stored API credentials at restRate limiting — Consider adding rate limiting to prevent abuseAPI key permissions — Use Binance API keys with minimal required permissions Extending the Bot Now that you understand how the bot works, consider adding:
More Binance tools — Spot/futures trading, order managementPrice alerts — Scheduled checks that notify users of price movementsTrade logging — Store trades to MongoDB for user historyMulti-exchange support — Add integrations for other exchanges
Next Steps
AI Agents Learn more about configuring AI agents and tools.
Binance Trading Explore all available Binance actions.
Data Operations Master MongoDB and database operations.
Secrets Management Securely manage API tokens and credentials.